I always wanted to have a small air purifier when I welded the electronics.
When I found a guide from Make magazine showing how to Make a portable range hood, I knew I wanted to build it for myself!
But I don't like this tin case.
However, I can indeed use the laser cutting machine.
So I want to make an acrylic case with a cutter.
I found the closing mechanism and hinges of the Adafruits Raspberry Pi case attractive, so I used them to fix the front.
Below you can find the link to Make and Adafruits Pi case Guide.
I did a workshop later where we built this and wanted to use a guide at the workshop.
This structure is used in that workshop.
This instructable is a lot of work in progress because every time I work in a workshop, I try to update it.
So let me know if you find any errors or have any ideas for improvement.
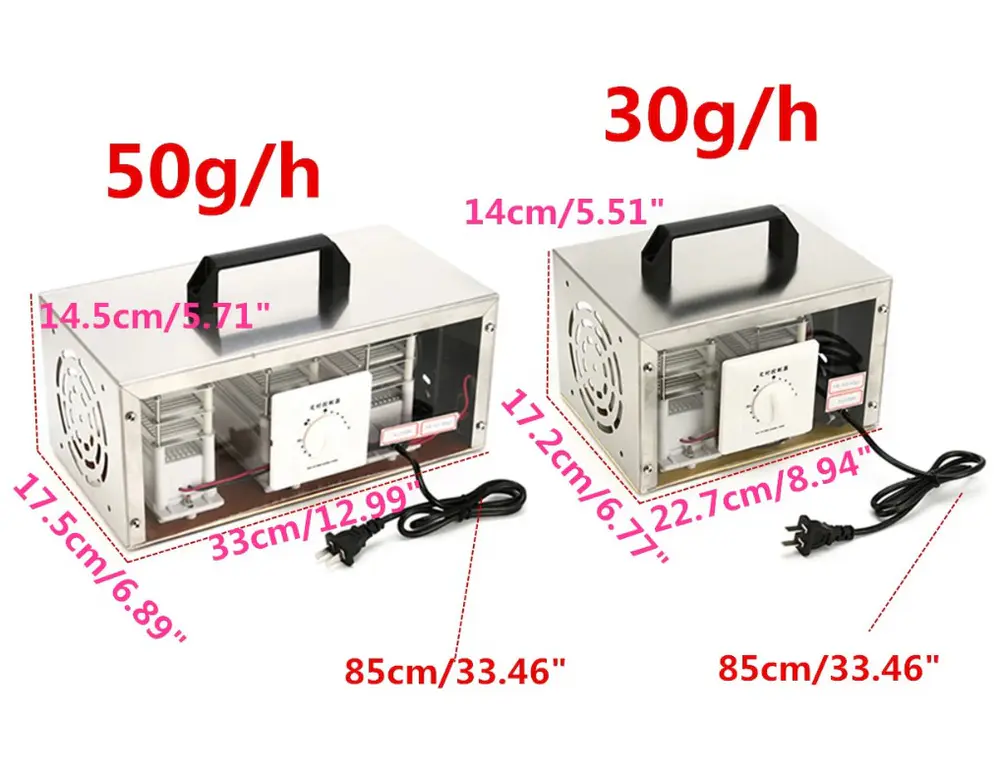
Production Magazine Guide: Pi case: this item you need: Material: 1x4x4 cm fan: metal grill: barrel plug: 9 v battery clamp carbon filter (
We will cut it into small pieces later)
: 3mm cast sheet board (
Minimum 16x21 cm)
4x3mm x 10mm bolts (
I used 16mm but 10 would be better)
4x3mm x 16mm bolts (
I used 230 here but 10 would be better)
Use 8x3mm of Nat silk or sun drying velvet sheet hot glue or acrylic glue polishing tool in shrink tubes of different colors: screwdriverStanley KnifeAccess to laser welded iron hot glue gun, cut the acrylic sheet into pieces of the box using laser cutting, which includes an illustrator file containing the box template.
Because this has changed many times, there are some problems in this situation, such as small gaps and cracks.
Hopefully I can find time to correct this in the near future.
In the meantime, if you make any corrections, please consider sending me the changed template.
Add the barrel plug and slide switch to different holes.
Use pliers if necessary.
Remember to weld the wire to the switch so that it matches the on off mark in the acrylic resin.
The correct position of the wire can be seen in the picture.
As shown in the figure, after welding the wire on the slider and switch.
I only used the black line for the switch as this will be used later to complete the ground connection.
Assemble the parts as shown in the figure.
From the back, add the bottom, then the partition wall inside, and finally the top with the slider.
Before gluing the parts together, it might be a good idea to wire the battery clip through the small holes in the inner wall.
It makes it easier for the entire assembly to assemble the parts from the inside using special glue made of acrylic or hot glue.
The choice of glue depends on the transparency of the acrylic resin.
If acrylic is transparent, then the hot glue will be very obvious.
Since my version was made of opaque acrylic, I ended up using only hot glue.
This also makes the case dry faster.
If you use hot glue, the tool for applying glue will come in handy.
For this I used the bottom of the table spoon.
Please note that the space for glue is not large, so try to make the lines of the glue as thin as possible.
By connecting the black line on one of the clips to the red line on the other clip, connect the battery clip in series.
Wrap the wires together and complete the connection by covering the exposed areas of the two wires with solder.
Remember to cover the exposed part of the connection with a shrink tube or insulating tape.
Remove the remaining wires from the battery clip and barrel plug.
Connect the barrel plug and the wire on the batteri clip parallel to the buck converter.
Remember to connect the black wire to the negative and the red wire to the positive.
Please read the whole step very carefully before proceeding.
I have seen a lot of people break this step because they are impatient and screw the screws too much.
Since we use a variable drop down converter, we need to set the output to 12 v stable.
If you want more suction, you can consider setting the drop down to more than 12 v.
However, this will use more power, so the battery will die faster.
Also, this may not be good for fans, so take the risk yourself :)
Connect the battery clip to two 9 v batteries first.
Place the probe on the multimeter on the drop-down output.
Use a screwdriver to turn the screws on the potentiometer on the drop down converter.
Be very careful when you do this.
It may take some time from you to transfer the screw to VALKUE on the display.
Turn the screw until the display drop-down of the multimeter provides about 12 v.
My friend's help is very convenient here.
Fix the screws with hot glue or nail polish.
I usually prefer nail polish because it allows you to move the screws again later if you want.
But there was no nail polish around me so I used hot glue.
Connect the red line on the fan to the positive side of the drop-down converter output.
Welding wires.
Connect a wire from the switch to the negative side of the drop-down list.
Connect the other wire on the switch with the black wire on the fan.
Cover the whole drop with shrink tube.
Put the drop down menu and fan into the box as shown.
Cut the carbon filter into a square of 40x40mm and place the nut in the hole of the fan.
Place the fan grill in front of the box, pass the long bolts through the grill, and place the front in the nut.
Screw the bolt in completely using a screwdriver.
Use 4 short bolts to fix the other grill on the back plate, and the rest of the nutsInstall install the carbon filter by placing a square in the middle of the fan, as shown in the figure.
If you build this or are inspired by this to do another building, please consider sending me a picture :)